In the Trim Healthy Mama world, homemade chocolates made with oil/butter, cocoa powder, and sweetener (and sometimes other ingredients) are called Skinny Chocolate (mostly because they have good fats and virtually no carbohydrates). In the keto and low carb world, these are often called chocolate fat bombs (for the same reasons).
In the healthy family world, there are ways to eat “candy” and chocolate (and some ways are very simple and inexpensive!) while still eating healthfully, keeping blood sugars balanced, not causing weight gain, and keeping us all out of the carb comas (or sugar sleeps) that regular candy and chocolates with sugar can cause.
This post will detail the most common ways to make/eat/have healthy chocolate on hand at all times. The first way is obvious: Purchase Lily’s chocolate bars (sweetened with stevia) in bulk from Amazon and store one in each purse, bag, and vehicle. 🙂 This might be all that some healthy eaters need to get their chocolate candy fix. Others are content eating the 70%, 80%, and even 90% sugar-free dark chocolate candy for health and cravings. And then move on to their healthy savory foods. And still others keep a bag of Lily’s sugar-free dark chocolate chips in the freezer and pull out a few when the urge hits them.
Others of us—especially we adventuresome types—must figure out ways to get the foods that others are eating into our diets in healthful ways. This post will help you out!
And for those who are joining me in the Daily Intermittent Fasting lifestyle, these are perfect for opening or closing your eating window!
Skinny Chocolates and Fat Bombs
There are dozens (hundreds?) of skinny chocolate and fat bomb recipes out there. So why bother putting my measly two recipes here? Because it took me three years to find two that I like!
You might have heard about my childish eating habits prior to a few years ago…yeah….that means everything that is new or different is “yucky.” And that is how I honestly felt about the homemade chocolates that I tried.
This one was too bitter. That one was too dark. Another was too grainy. This new one was too soft. The “healthiest” one was too coconut-oily. On and on.
It wasn’t until I hit on somebody talking about using half coconut oil and half butter that I started finding them palatable. Then when I added peanut butter (technically no longer making it a true “skinny chocolate”—still not sure why butter and coconut oil are that much better than peanut butter in some low carb worlds), I knew I could make my own inexpensive chocolates and really love them. (As in, I can’t stay out of them! Now I’m having too many calories—even though my carbs are low!)
So here are my two versions. They really are yummy, inexpensive, simple, super fast, and healthy! Note that you can also add nuts, almond extract, peppermint extract, coconut, etc., to make “specialty” candy!
Of course, the downside to them (and any chocolates that you make with oil and cocoa as opposed to chocolate chips or chocolate bars) is that they melt (as in melt into liquid in the summer). They must be kept in the freezer. That makes it difficult to transport in your purse!
Oh, I’ve heard that all cocoas are not the same! Some cooks in low carb groups swear that their chocolates are significantly different based on their cocoa powder. To be safe, I would get the best cocoa powder you can afford. While this is way less expensive to make than candy with sugar-free chocolate chips or chocolate bars, you still don’t want to waste time or ingredients to discover that your inferior cocoa makes inferior candy.
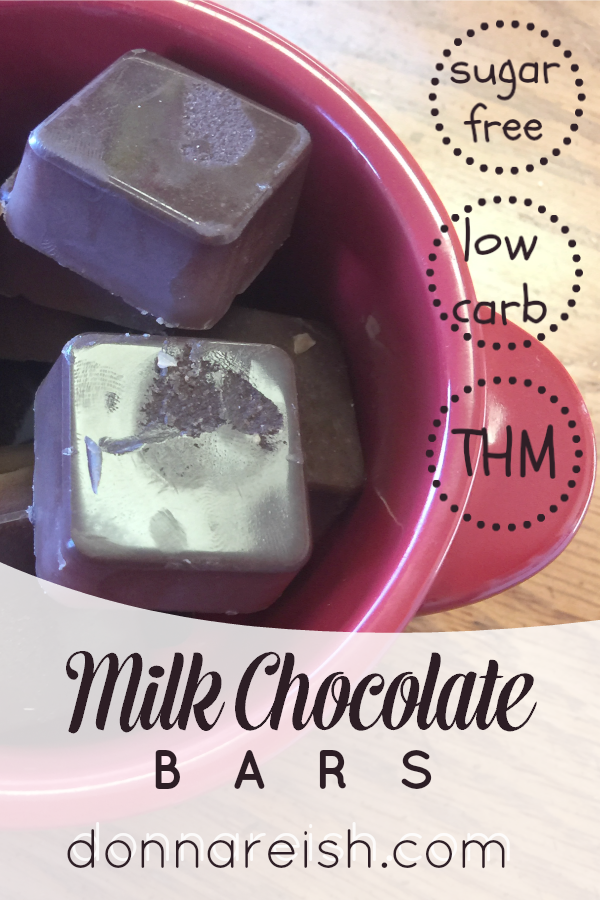
“Milk Chocolate” Bars/Skinny Chocolate/Chocolate Fat Bombs/Homemade Chocolates
As I mentioned in the opening, these are called many things, so take your pick! I like to call them my Milk Chocolate Bars to distinguish them from my fudges and other candies (and my PB-Flavored Chocolate Bars). Also, if you are following THM to a T, these will not work as Deep S since they have coconut oil and butter in them. They are great for other S applications and for low carb dieters, sugar-free dieters, and healthy eaters in general!
While I call these my “Milk Chocolate” Bars, I have to admit a tad bit of disappointment that I could not get them as “milky” as I wanted. They are good—way better than my first three years of skinny chocolate experimentation, but everything I did to make them “milkier” did not work. I want to warn you so that you don’t waste your time or money. I tried adding cream, and I ended up with ganache (it was yummy!). I tried dry powdered milk (made even more powdery with a coffee grinder), and even the addition of a tablespoon of this made it separate into yucky-looking glumps that could not be put into molds or even into a plastic-ware container to freeze (had to be pitched). The same thing happened with protein powder, coffee creamer, etc. It just wasn’t happening.
So the main tweak to the original recipe this was based off of was to half the coconut oil and add the same amount of butter. This definitely had a less coconut-oil taste and a little more milk chocolate taste. I made these in molds that look just like those old candy squares called Ice Cubes. (I think they still sell them at gas stations and Cracker Barrel!) That is exactly what this chocolate reminds me of. Not too bad for oil, butter, cocoa powder, and sweetener. Inexpensive and delicious.
I should add that if you do not powder your sweetener before making my chocolates (or any Skinny Chocolates, etc.), you will likely have to mix the chocolate in a food processor or blender. I find it easier to grind a bunch of sweetener up at a time (see sweetener chapter) and keep it in my canisters that making every batch of chocolate in a blender!
Reminder: Homemade chocolates with oil, butter, and cocoa will likely dissolve at room temperature after a few hours. If you want to put these on goody trays, you will need to add them at serving time. Otherwise, store them in the freezer.
Below are links to the ingredients I use in the recipe above. I am an affiliate for Amazon.com. If you click on the links below I will earn a small commission. Thank you for your support of this blog!
Sugar-Free “Milk Chocolate” Bars Recipe
- ¼ cup coconut oil
- ¼ cup butter
- 1 tsp vanilla
- Shake salt
- 4 TBSP powdered Pyure (Or use 8 TBSP of a cup-for-cup powdered sugar sub)
- 1 ½ TBSP cocoa powder
- Melt butter until just barely melted. (Do not boil.)
- Stir in coconut oil (solid is fine) into butter until both are combined well and “liquidy” (do not heat.)
- Add remaining ingredients, whisking quickly to combine thoroughly.
- Pour into molds or flat container.
- Freeze for a few minutes until solid.
- Remove from molds or cut into squares and store in air-tight container in freezer.
PIN THIS RECIPE!
“PB Flavored Chocolate” Bars
Skinny Chocolate/Chocolate Fat Bombs/Homemade Chocolates

This is the one. This is the recipe that made me think I could really enjoy “skinny chocolate.” Okay, it’s not really skinny chocolate because it has peanut butter in it, but it is wonderful. (And those of you who are purists can experiment with peanut flour in place of the peanut butter in this recipe for a more traditional skinny chocolate.)
I can’t really compare it to any sugary candy bar. It is in a class by itself. I love it so much that I would rather have this in my lunch bag than Chocolate Walnut Fudge or No-Bake Peanut Butter Bars (but not more than healthy Sugar-Free Tag-Along Girl Scout Cookies!). However, I don’t carry it in my bag because I don’t want it to melt if I carry my bag in and it stays at room temp for a while. It needs to be kept in the freezer, but it is yummy, inexpensive, and simple to make.
- ¼ cup coconut oil
- ¼ cup peanut butter
- ¼ cup butter
- ½ tsp vanilla
- Shake of salt
- 3 TBSP powdered Pyure (or Gentle Sweet or Homemade Pyure, or other stevia blend) Or use 6 TBSP of a cup-for-cup powdered sugar sub
- 1½ TBSP cocoa powder
- Melt peanut butter and coconut oil together.
- Add remaining ingredients, whisking quickly to combine thoroughly.
- Pour into molds or flat container.
- Freeze for a few minutes until solid.
- Remove from molds or cut into squares and store in air-tight container in freezer.
- I make this one in an 8 x 8 baking dish lined with parchment. It is firm in a few minutes, and I remove it (using the parchment as handles), cut it into squares, stick it in a plastic ware container, label it, and pop it in the freezer. That is how I distinguish this from the Milk Chocolate Bars, which I make in molds.
PIN THIS RECIPE!